

Raised beds on pavement is a strategy for gardeners with limited growing space. Learn how to grow food in raised beds on paved surfaces such as concrete or asphalt.

This page may contain affiliate links. Please read my disclosure for more info.
In this article:
- Should I depave or build raised beds on pavement?
- What height should raised beds on pavement be?
- How do you fill a raised bed on pavement—without breaking the bank?
- When is the best time to build raised beds?
- How (and what) to plant in a raised bed on concrete or asphalt?
- How do you maintain raised beds on pavement?
- 5 FAQs about gardening on raised beds on pavement
My first homestead on one-tenth of an acre was lacking in garden space. At the time, I was frustrated by this limitation. Now, however, I realize how lucky I was! It forced me to be creative and explore a number of food-producing experiments that I might not have tried otherwise.
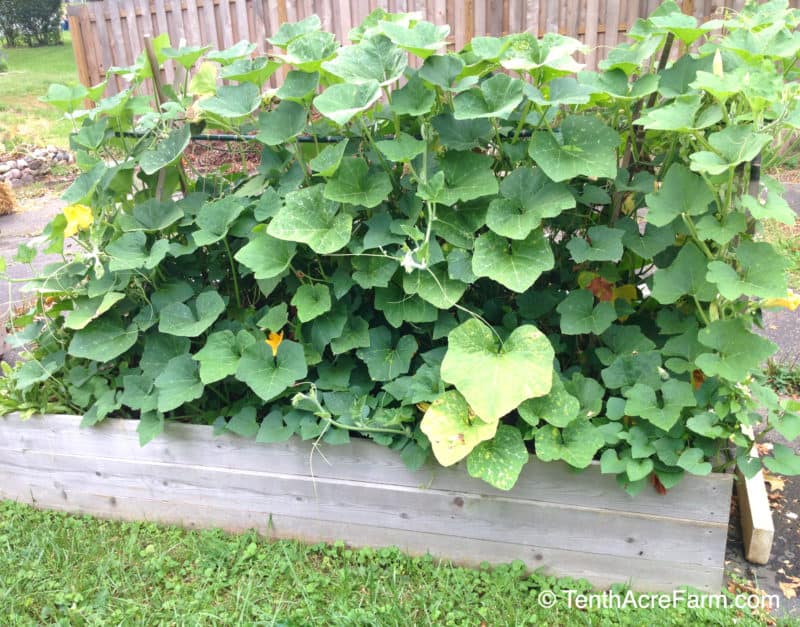
One experiment that worked really well was building two raised beds on one side of my driveway. I had considered depaving this unused section of the driveway, but decided to build raised beds on top of it instead. See the next section for more details about that decision.
It was totally worth it! Even though my raised beds were in the shade, they consistently produced around 80 pounds of vegetables each season.
Through this experience, I discovered several keys to growing successfully in raised beds on pavement. We’ll look at those in this article.
Depaving vs. Building Raised Beds on Pavement
The question of whether to depave your garden site or to build raised beds on top of the impervious surface comes down to your goals and the physical labor involved.
I love the idea of depaving a hard surface. Our ecosystems desperately need more rainwater to infiltrate the soil and recharge the water table right where it falls, rather than overwhelming local watersheds. And why allow it to run off when it could easily water your garden for free?
Depaving is often the more ecological choice, but it isn’t a slam-dunk in all situations.
Here’s why:
The removal process may activate toxins that have been lying dormant, causing them to leach into your soil as well as your local watershed. That’s why I decided to build raised beds on top of my blacktop driveway rather than depaving the unused section.
Another downside to depaving is the labor involved. Be prepared to cut and pull up the paved surface using tools like a sledgehammer, jackhammer, and crowbar.
For more step-by-step details on depaving, this book is a good resource:
The Urban Homestead: Your Guide to Self-Sufficient Living in the Heart of the City.
If building raised beds on top of pavement is still the best strategy for you, then read on! Let’s start with sizing your raised beds appropriately for growing on top of pavement.
Would you like to grow more food with less effort? Check out my mini guide, The Permaculture Inspired Vegetable Garden.

How Tall to Make Raised Beds on Pavement
Your crops need room to stretch their legs and send their roots down, down, down. The deeper the raised bed, the more room crops have to grow a strong foundation. Say ‘no’ to floppy plants!
A deeper bed also helps crops to be more self-sufficient. That’s right! It holds moisture longer, which means less watering. In addition, crops with more and deeper roots can access more nutrients in the soil, which means less fertilizing.
Therefore, I recommend a raised bed that is a minimum of 24 inches tall and an ideal height of 32 inches. The taller the better! My own raised beds on my driveway were 24 inches tall, and they performed well. But they conserved water by being partially shaded.
In full sun, a taller raised bed will likely perform better in hot summers.

That’s a lot of raised bed! How do I fill a raised bed on pavement without breaking the bank?
Filling raised beds on pavement is a bit different than filling raised beds on permeable ground. To decide how to fill the bed, we need to understand how rainwater behaves inside a raised bed on pavement versus a raised bed on the ground.
Rainwater in a Raised Bed on the Ground
As gravity pulls rainwater down through a raised bed, it nourishes the water table in the subsoil below it. Once the water table has been replenished, excess water drains away into the local watershed.
As the raised bed dries out, it wicks moisture up from the water table underneath. With the appropriate mulching practice, it can oftentimes tide the garden over until the next rain.
This is nature’s water banking system. The garden makes rainwater deposits and later makes withdrawals as needed.
Rainwater in a Raised Bed on Pavement
This setup is a bit more contrived than the natural system described above. Gravity pulls rainwater down through the bed and, rather than hydrating the water table below, it is whisked away on the hard surface.
This means that once the raised bed dries out, there’s no moisture below to wick up. There’s no banking system from which to draw up moisture.
As you decide how to fill your raised bed, this is an important point to consider.
Filling Raised Beds on Pavement
The rapid discharge of rainwater through raised beds on pavement can wash your nice soil away if you don’t plan ahead! Here’s how I recommend filling your beds.
Bottom Layer: Gravel
Your first line of defense against soil erosion is filling the bottom of the raised bed with about six inches of gravel. This helps with drainage and prevents the soil from washing away in a heavy rain. It also reduces the chance of garden crops coming into contact with the pavement.

The Soil Contents of Raised Beds
There are lots of options for filling the space above the gravel, and this depends on what kind of organic matter you can gather.
Your goal is to find high-quality sources of organic matter, which is important for growing healthy crops. It’s also important because organic matter acts as a sponge, holding water and moisture for a longer period of time.
Living soil has what are called soil aggregates, those sticky components that hold moisture in the soil.
This is in contrast to sterile potting soil that you might purchase in bags. One of the biggest mistakes you can make, in my opinion, is treating a raised bed on pavement like a big container garden.
Whereas living soil continues to self-renew and provide a nutrient rich environment, holding moisture for longer after a rain, sterile potting soil eventually dries out and loses its nutrient value.
Hugelkultur
You might consider a hugelkultur approach if you have access to dead wood. This word simply means “mound culture” in German, and refers to a mounded or raised bed that has a base of decomposing wood.
Rotting wood encourages fungal networks to develop, which speeds up the rate at which your soil contents can start working together as a mini ecosystem.
In short, dead wood holds moisture in the bed, and fills the space quickly and inexpensively.
To try this method, add a layer of decomposing logs and other dead wood pieces on top of the gravel. Note: Logs are preferable over wood chips.
Now it’s time to fill the rest of your raised beds on pavement with loose, rich growing medium. Gather things like:
- coffee grounds (collected from local coffee shops)
- compost (homemade or store bought)
- garden soil (Real soil from your yard or garden, even a couple shovels-full, which may include fungal networks and earthworms for building an ecosystem!)
- grass clippings
- kitchen scraps (egg shells, fruit, vegetable)
- leaf mold (leaves that have aged for two years)
- livestock manure
- shredded office paper
- worm castings (homemade or store bought)
Avoid Persistent Herbicides
Persistent herbicide contamination is a big problem in many organic materials. It can damage crops and poison soil and can take more than three years to break down.
Learn how to:
- Keep herbicides out of your compost bin
- Avoid purchasing herbicide-contaminated soil
- Source herbicide-free manure
Alternate layers of these materials like lasagna, a couple inches at a time, saving the compost for the top layer.
Would you like more strategies for growing food in small-spaces?
You’ll find loads of information just like this in my award-winning book, The Suburban Micro-Farm.

Quiz: When is the best time to build raised beds?
Answer: The most ideal time is fall. That’s because the contents will settle over the winter, and you can add more organic matter in the spring before planting. Build at any time, but be aware that the contents will settle.
And that leads me into planting.

How to Plant in a Raised Bed on Concrete or Asphalt
First, let’s discuss the when. The “lasagna” layers of your bed need some time to compost down. This “actively composting” soil actually has a different microorganism makeup than that of finished compost soil. In fact, garden crops generally prefer the soil organisms that inhabit finished soil.
If you’ve ever had a new garden bed not perform well, this might be why! Sometimes the contents of the bed are fine, it’s just that the soil contents and soil organisms needed to settle and balance out before planting.
So, give it some time. Again, that’s why I like to build beds in the fall and plant in the spring. But even then, don’t judge a new garden’s performance too harshly.
Now, let’s discuss what to plant. Here are some crop suggestions to go easy on your garden in the first year:
- Beets – I like Botanical Interests’ colorful Gourmet Blend Beet seeds
- Herbs (basil, parsley)
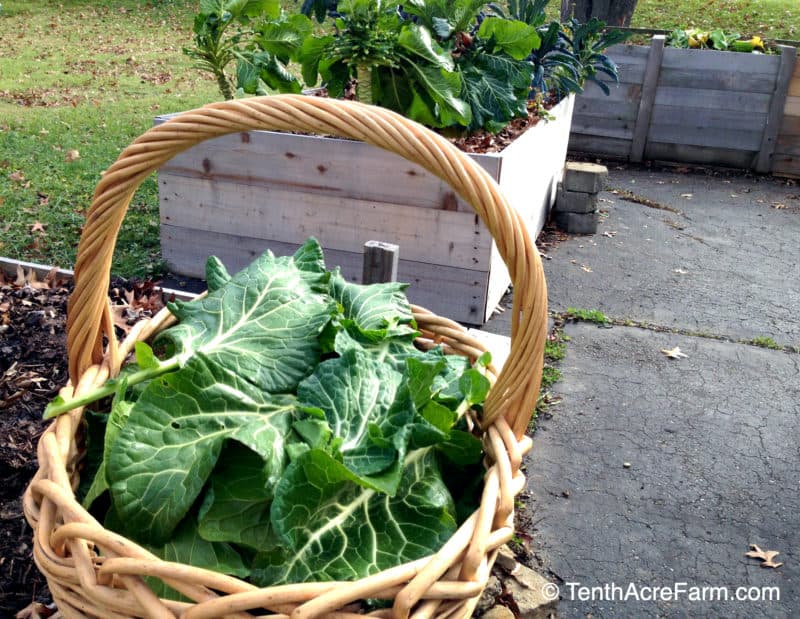
- Leafy greens (chard, collard greens, kale) – this Power Greens collection from Botanical Interests includes 10 different varieties
- Legumes (beans/peas)
- Onions
Planting in the fall? Get my fall planting guide.
After the first year, the sky’s the limit! For example, if your pavement really heats up, then your raised bed might be the perfect spot for sun-loving tomatoes, peppers, and cucumbers.

Photo shared with permission from Kris @ Attainable-Sustainable.net. Grow bags are a low-commitment way to garden on pavement.
Maintaining Raised Beds on Pavement
Even if you’ve used excellent living soil that holds on to moisture, your raised bed on pavement will still dry out faster than a raised bed in the ground.
Therefore, you’ll need a well-planned watering strategy.
Irrigation
Your raised beds may dry out faster, even if you’ve followed my other tips mentioned above. Here they are again:
- Build a deep raised bed.
- Add lots of high-quality organic matter.
- Mulch appropriately.
Be prepared to water regularly, especially when seeds and seedlings are just getting established. After that, weekly, deep waterings will saturate and cool the soil, hydrating the deeper roots that nourish your crops.
Fertilization
Starting midsummer, I like to use a liquid fertilizer every couple of weeks—when watering—to ensure crops have all the nutrients they need to make it to the finish line. Some fertilizers that I like (which activate soil organisms, too) include:
Renew Soil
Add: Each fall, I make it a habit to refresh the soil with rich, organic matter. Your beds will decompose and naturally sink over time, so I take the opportunity at the end of the season to fill them back up with enriching contents that encourage microbial activity.
If your garden beds are slow to thrive, try adding humic acids in the fall, which encourage the creation of humus and establish beneficial soil microbes. Or, specifically, add more worm compost.
If the soil contents of your bed seem heavy and waterlogged, then try mixing in some coconut coir.
Mulch beds well to protect them through the winter and reduce weeds.
Aerate: As dead wood and other contents of your bed decompose, aerating helps the soil remain loose and crumbly. But raised beds on pavement are a delicate ecosystem. Use a digging fork rather than tilling.
Sow a cover crop: This is another way to enrich soil and help accelerate the creation of a mini ecosystem.
- Summer: Buckwheat, cow peas, or millet
- Winter: Daikon radish, oats, or winter rye
See what seeds I like to include in my ‘kitchen sink’ cover crop mix.
5 FAQs About Gardening in Raised Beds on Pavement
#1: Can raised garden beds be placed on concrete?
Raised beds can be placed on paved surfaces, including concrete and asphalt, with some modifications to support drainage and healthy plant roots.
#2: What is the ideal height for raised garden beds placed on concrete?
Ideally, a raised bed on concrete should be 32 inches tall in order to give the roots access to nutrients and room to grow. At the very least, it should be 24 inches tall.
#3: Can you safely grow plants in a raised bed over asphalt or concrete?
Growing in raised beds on paved surfaces, such as asphalt or concrete, is perfectly safe. That’s because the beds have a base layer of gravel which prevents the soil and plant roots from coming into contact with the surface.
#4: How do I fill a raised garden bed on pavement without breaking the bank?
Filling raised beds on pavement is a bit different than filling raised beds on permeable ground. You’ll want to start with a bottom layer of gravel. There are lots of options for filling the space above the gravel, and this depends on what kind of organic matter (such as grass clippings, compost, or even shredded office paper) you can gather.
#5: How do I maintain a raised garden bed on pavement?
To ensure your plants thrive, it’s essential to implement a well-planned strategy that takes watering, fertilization, and soil renewal into account.
If you have limited growing space, building raised beds on pavement is a relatively easy way to grow more food.
Do you garden in raised beds on concrete or asphalt?
READ NEXT:
- Are Raised Beds Right For You?
- How to Improve Clay Soil in 6 Steps
- How to Source Herbicide-Free Compost Soil


Irena says
Thank you! This came right on time! I was just starting to serach more about those pavement gardening options and details how it functions. you made great article that covers all my quastions!
Amy says
Wonderful!
Yana says
I have a few beds on a paved part of my garden. I was scared they wouldn’t produce much when I first planted in them but they performed very well.
Rebecca says
Hi!
I live in the city & would like to expand the garden I have under a tree we had planted about 5 years ago.
The issue I am having is that there’s concrete sidewalk on both sides of this garden.
I have been researching ways to do this correctly yet have not had any luck until I read your post,
I would love your input! If I sent you photos of the area could you give me your two cents?
Also…I want to use stone to make a layered boarder…maybe 6-8” high?
Looking forward to hearing from you!
Regards,
-Rebecca
Mina says
Can you confirm the bed doesn’t have a bottom? you just construct the sides and then put gravel in it such that the gravel is directly on the concrete?
Amy says
That is correct.
janet diamond says
hi I live in California where it doesn’t rain all summer. we put our driveway raised beds on pallets covered with chicken wire. we use Ecopots which are made out of discarded bottles.
the pallets allow are to circulate.
Anita says
Hi Amy,
I’m planning a raised bed in our courtyard and reading about raised beds, it’s mostly said that after 5-7 years, it has to be renewed completely, because “the nutrients are used up”. Do you agree on that our is it possible to maintain it for longer by constantly adding organic material?
Regards, Anita
Amy says
I think it comes down to the size of the container. A small potted plant definitely needs the soil replaced each year, but a larger space like a raised bed should be fine as long as you’re adding compost soil, worm castings, etc. each year to refresh it and replenish what was lost.
Barry Roberts says
Hi Amy i have just finished 2 raised beds that are 6×4 and 22 inches high, these are in my back garden which has flagstone on the ground (former owners). I have built raised beds for years now on flagstone with good success, using some wood slats on the bottom of the beds with drilled holes for drainage, plus some DPM on the bottom as well also with the holes and some more DPM on the side walls.
I would like to know what you think of my new raised beds set up, it starts with a 4×2 frame flat, then on top of that there is a 7×2 frame on it’s edge and flush with the front, which leaves plenty of room for wood slats to sit inside, with drilled holes and space between each slat for drainage.
Then there is another frame of 7×2 and finished with a 6×2 giving an approx total of 22 inches in height, this will be filled with a sheet of weed membrane, cardboard and some chopped up logs from the neighbours tree, then some revitalised compost from last year, then finally finished off with fresh compost.
All the compost mixture will have Blood, Fish and Bone and Perlite all mixed together and Rape Seed Straw as a mulch.
What do you think? and sorry for the long message.
Stay Safe,
Barry (ENG)
Martha Keller says
I built raised beds for strawberries using small evergreen logs as “walls” and split wood to fill. When I had to dismantle the bed 2 years later the wood was infested with Japanese beetle grubs by the hundreds. Great snack for my chickens but a garden disaster in the making. Maybe soft wood would have been better or maybe I should have split the wood into thinner pieces. I’m going to build raised beds using corrugated metal this time. Great info here about how to fill the deep boxes. I’ve used straw bale flakes too in the bottom.
Brenda M Barnicki says
Great article Amy! My non-profit social enterprise, Bellafina Chocolates, inherited a very ugly downtown paved lot when we moved into our building in 2015 and we were not allowed to de-asphalt. We rallied some amazing volunteers and built 12 large raised beds on asphalt, 24″ to 36″ tall. We filled them with nearly 25 tons of soil, compost, and other organic matter and established a “natives and edibles” garden. As the name implies, every tree, bush and perennial plant in the garden is either native to our area or produces edible herbs, fruits and veggies (or both!). We irrigate with a rainwater collection system from our ~5000 ft2 roof. 5 years later, the garden has beautified our corner of downtown, attracts loads of pollinators and songbirds, has produced lots of food for our volunteers (and occasionally to mix into our amazing chocolate truffles), AND has twice won our city’s neighborhood beautification award. We offer tours to those visiting our area of beautiful East Tennessee. Email and I’ll send photos!
Anna Pradhan says
Hi, did you build your planters with the bottom part or like Amy without it?
Jill Timm says
Hi Amy. I’m trying to start an above garden on my concrete driveway. How can you protect the concrete from staining? I bought a corrugated metal sided planter with no bottom. I was thinking of some kind of safe poly sheeting with gravel then layers of branches etc before soil? Help! 😃
Amy says
With a 6″ base layer of gravel, there should be minimal, if any, staining. Branches on top of the gravel certainly couldn’t hurt.
Anna says
Is there any disadvantage to build a planter box with the bottom rather then without like you did?
Amy says
The pavement acts like a bottom, so including a bottom to the planter box is a redundant use of material. However, as long as you include a drainage strategy then it’s fine to have a bottom.
Carol Taylor says
Hi. I have a metal raised bed on pavement that I’m so happy with, I bought 4 more to change out deteriorated wooden boxes. I used weed cloth as a barrier on the original planter. My concern is the hot pavement conducting heat and evaporation, should I consider a better barrier? I’m in West Tennessee and it’s over 100 today.
Amy says
Heat is certainly a concern for raised beds on pavement or blacktop, and for that reason, I would prioritize growing heat-loving summer crops like tomatoes, peppers, eggplant, sweet potatoes, squash, etc. I don’t think the weed barrier will do much to change that. Metal is a conductor, so those beds will be hotter than wooden raised beds. Keep the beds consistently moist, as that will cool down the soil a bit. If you think your crops are experiencing heat stress, in addition to the above, you can hose off the pavement around the beds each evening, which will encourage cooling.