
The materials you need to start a garden can add up in cost. Here are six ideas for starting a garden on a budget without breaking the bank.

This page may contain affiliate links. Please read my disclosure for more info.
Gardening can seem overwhelming when you consider all of the materials you need to get started. Seeds, fencing, soil, tools, and more can add up—even on a generous budget.
Unfortunately, we can’t sprinkle magic fairy dust and have everything we need to instantly start a garden. 🙁
Gardening for the Budget-Conscious
Reader Question: Have you kept track of how much money you spend on your garden supplies, from seeds to fencing, to gravel and tools? I am feeling a little overwhelmed with all of the supplies I need to purchase to work on my yard.
Amen to the overwhelm!
Overwhelm is a common feeling when starting any new hobby or lifestyle. Take that daily yoga routine I’ve been wanting to start, or learning to play the ukulele. It just seems too much to take on if I also add a budget restriction. It makes me want to throw in the towel before I’ve started!
See, sometimes we let feelings of overwhelm talk us into procrastinating because the problem just seems too big to overcome. But let’s see if we can find some small, actionable steps that help us move forward with our garden plans (before procrastination sets in) even if we are cash-strapped.
Speaking of overwhelm, I wrote more on that topic in my article 7 ways to start a new homestead. It highlights more things you can do while saving money for your big garden dreams.
Here are six ways you can start a garden on a budget.

Garden on a Budget – Action 1: Start Slow
Gardening can be quite expensive in the early years when you’re setting up the infrastructure of the garden.
It would be easy to spend upwards of $1,000 a year* buying many of the necessary supplies and equipment! However, it would be very difficult to grow $1,000 worth of food in those first few years.
That’s not a glowing endorsement for breaking the bank and rushing into things!
The return on investment of vegetable gardening tends to be gradual. You’ll grow more produce each year as you hone your skills and become accustomed to the conditions of your little slice of heaven (soil, sun, water, climate, etc.).
Ultimately, it can work in your favor to garden on a budget. It means you don’t have to break the bank to get started!
Start small, and the money you spend on development can be gradual to match the gradually increasing return. Expect your first year to be the starting point that it is. There’s no where to go but up!
In other words, Patience you must have, my young padawan. 🙂
*$1,000 is a random number I made up. Someone who is building a shed, raising chickens, and putting up fences might spend more than that, while someone building a single raised bed in their backyard may spend less than that.
Either way, you can expect your garden development to cost more than you think it should and more than you wish it did.
Grow a garden that’s both productive and manageable with my Complete Garden Planning System, which includes practical tools for planning your season from seed to harvest.
Garden on a Budget – Action 2: Observe More, Do Less
One benefit of starting slow is that you’ll get to observe the gradual changes of your garden over time.
As I developed my previous permaculture edible landscape over the course of eight years (complete with berry bushes, fruit trees, rain gardens, raised beds on the driveway, a composting system, and more), one thing I said over and over is how thankful I was to have a restricted budget.
Because I didn’t have the resources to develop the entire landscape in the first year, I did it bit by bit, year by year.
And you know what happened?
Every time I developed one little bit and observed how it worked within the larger system, I discovered something I hadn’t thought of, and that discovery changed and improved the next little garden project (saving me time and money).
This happened through trial and error, and at the end of eight years, I had developed something that I hadn’t envisioned in the first year. The resulting landscape was prettier, more functional, and more robust than I had originally imagined; all because I took it slow and observed along the way.
Garden on a Budget – Action 3: Save on Raised Beds
Read more about raised beds:
Save on Building Materials
On my new homestead I want to build raised beds, but the price tag on rot-resistant lumber, such as cedar or redwood, is a nightmare! However, since these types of wood are ideal for longevity and keeping contaminants out of the garden, the price may be worth it.
If you decide raised beds are in your future, you can still garden on a budget while you save for those expensive materials.
Try adding compost to the existing soil and gardening there. You may find it works wonderfully, and that raised beds aren’t actually necessary. But if not, consider it practice!
Here are some budget-friendly, raised-bed materials:
- Cinderblocks
- Galvanized stock tanks
- Logs
- Pallets (see picture below)
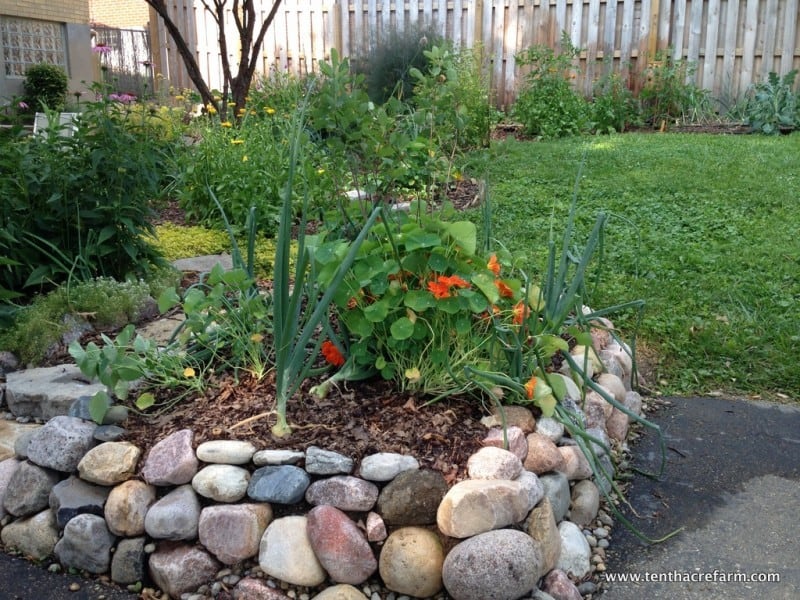
- Rocks

Pallet raised beds
Here’s how to tell if pallets are safe for gardening projects.
Save on Raised Bed Soil
This is a biggie! Raised beds take A LOT of soil. Importing bulk soil can be expensive, as well as potentially toxic for edible gardens. Unfortunately, bulk compost soil can be contaminated with herbicides, which may damage crops and poison soil for years.
I now aim to make most of my own soil so I know what I’m getting, starting with building a composting system. This means some delayed gratification on my part. There are a few things I need to do to keep herbicides out of my own compost soil, even though I don’t use herbicides in my own yard.
Building your own soil saves money, but you’ll have to wait a year while it makes itself (Still, it’s so cool that it makes itself!).
Some DIY approaches to building soil include starting worm bins for composting kitchen scraps, shredding and composting leaves (pick up curbside leaf bags in the fall/winter), yard waste (from your own no-spray yard), and free wood chips (contact local tree trimmers or Chip Drop).
These composted materials add soil structure, bulk, minerals, and micronutrients.
It may take longer to build your beds, but they’ll be healthier without breaking the bank. And it’s better than importing contaminated soil that could take years to restore.
With a little delayed gratification, you’ll be ahead of the curve.

Spreading homemade compost on spring garden beds.
Would you like more pointers for starting your garden on a budget?
You’ll find more of my tips, tools, and life hacks (including the 15-minutes-a-day garden) in my award-winning book, The Suburban Micro-Farm.

Garden on a Budget – Action 4: Choose the Right Tools
When I first started gardening, I didn’t have any tools for digging or building a landscape. So I started out with the cheapest tools I could find. Some of them came from my parents’ garage that they no longer used. Others I found at garage sales and discount stores.
If I wasn’t starting a garden on a budget in my first year, I would have gone out and bought a bunch of tools I thought I needed. But they wouldn’t have been the tools I actually needed!
To find out what tools I actually needed, I needed to get started, get my hands dirty, and discover what I needed.
This is a round-about way of saying that if you have to start out with cheap or poor-functioning tools, you’re actually in a good place. Weird, I know!
You’ll quickly discover which tools would make your life better because they’ll be the ones you always reach for. You’ll groan with frustration because they’ll be the ones that break, give you blisters, or make you work twice as hard.
Through this process of just getting started, I discovered which tools were going to give me a good return on investment, and I purchased good quality versions of them as the cheap ones broke or as I found money in the budget.
If you’re considered to be on a low income, there may even be some non-profits or other local assistance to help you access the tools you need. If you live in a neighborhood association, you may be able to borrow tools from a community toolbank, which lends tools to non-profit organizations.
A good gardener—regardless of budget—is resourceful. It makes good sense to start out with what you can hunt down, and add the things you truly need later.
My top five favorite tools for my no-till garden are:
- Felco Pruning Shears (for cutting woody plant matter)
- (F 7 Felco) Pruners for Large Hands
- (F 12 Felco) Pruners for Medium Hands
- (F 17 Felco) Pruners for Left Handers
- Hori Hori Garden Knife
- Heavy Duty Digging Fork
- Stainless Steel Garden Shears (for cutting green plant matter)
- Winter Garden Gloves
I purchased these nicer versions as soon as I could, somewhere between my second to fourth gardening years. I’m sure I whined about it until I convinced Mr. TAF that they needed to be in the budget! 🙂
But you know what? I appreciate them immensely because I planned ahead, chose the right tools, and budgeted for them.

Build your own soil to save money and know what you’re getting.
Garden on a Budget – Action 5: Forage for Other Awesome Materials
Things like garden borders and pathways can be made up of whatever you have on hand, especially if you’re starting your garden on a budget.
For a DIY border that keeps kids and dogs out of the garden, try collected rocks or wine bottles. If you don’t personally enjoy wine, simply ask at your nearest bar or restaurant; I’m sure they’d save some for you!
I enjoy lining beds and pathways with split firewood that is past its prime.
Ask your friends and family for possible useful items. Remember, their junk could become your treasure, and everybody wins! Craigslist and Freecycle are great places to check, too.
Garden on a Budget – Action 6: Become your own Seed/Plant Vendor
Learning a few skills is a great money-saver when you want to garden on a budget. You might seek out free local classes or find more information online.
Starting your own seeds can save money that you would normally spend on purchasing seedlings. If you have a greenhouse or cold frame, you’re way ahead of the curve.
Starting your own seeds indoors under lights saves money in the long run. However, this solution requires you to purchase a lot of equipment up front, so I don’t recommend it until you have a few years under your belt and can invest in this extra equipment.
Saving your own seeds is a really rewarding experience. How amazing would it be to start off spring planting with your own seeds that you saved from your own plants? This is a worthwhile skill to learn that doesn’t cost you a thing!
Here are a few resources about seed saving:
Grafting is a technique for creating fruit trees, among other plants, that meet specific needs. It works by attaching the tissue of one plant to the tissue of another.
For example, if one variety of apple is known for its strong roots, and another variety is known for its disease-resistant fruit, tissues of the two can be attached together to create a hybrid variety that is more robust.
This skill can help you to produce a whole lotta fruit trees for a very low cost! Here’s a great tutorial on grafting.
You can also propagate many fruit crops for free by taking cuttings from existing plants. Your friends and neighbors will likely be happy to donate cuttings.

Homegrown and saved coriander (cilantro) seeds
The Hard Truth About Gardening on a Budget
The beginning years of developing a garden or edible landscape certainly cost more both financially and in terms of sweat equity. This is understandably overwhelming to think about, but remember that small, actionable steps are what will move you forward.
At the end of eight years at my old house, the garden and edible landscape were fairly well established, so I spent less money each year on buying seeds and miscellaneous supplies.
However, the first few years are quite different! I’m reminded of that now that I’m beginning to develop my new homestead. I’ll have to build it in stages as my budget allows.
It’s hard to delay gratification when you’re so excited to start a garden, but you’ll be rewarded for budgeting, planning ahead, and starting small.
In the meantime, observe your landscape through the seasons, creatively source the items you need, and practice gardening even if the situation isn’t ideal. You might also want to consider asking for gardening-related gifts. My Gift Guide for Permaculture Gardeners includes some of my favorite products that make gardening with nature a fun and rewarding experience!
Stay focused on the small actions you can take to move forward, and your dreams will become reality!
What is your tip for starting a garden on a budget? Share it in the comments below!
READ NEXT:
- 5 Reasons to Homestead in the Suburbs
- 5 Myths About Starting a Micro Homestead
- Year-Round Gardening: It’s Easier Than You Think


Cara says
I always save seeds for the next year, then I trade seeds with family and friends who save seeds from other plants. This last spring I traded Buttercup and Acorn squash seeds for Indian corn, sweet corn, green beans, and peppers. We do the same thing with started plants since it’s easier to start one type of seed rather than have four or five different types to keep track of.
Amy says
This is a great idea…how wonderful that you can share in the joy of gardening with your family!
peggy covington says
what seeds can use save and use the next year to plant and grow. I do gardening and on a budget. I’m getting ready to start mine for this year.
Amy says
See the link in the article above for ‘Seed Saving 101’.
Don Reeves says
Since my native soil is about 90% CLAY, I make a lot of compost. I friend of mine was moving and offered to sale me their Mantis twin-bin composter (retails for about $500 + shipping) for $50. I found another used “Lifetime” brand composter at a yard sale and bought that for 10 vents on the dollar. The same can be said for my cold frame that was used, but still fully functional. Gardening tools can be bought at a greatly discounted price, if they have been used. I make my own free beneficial nesting material by locating old elderberry stalks in winter. Then, cutting the stems with a hack-saw. I use the natural hollow cavity for nesting tubes for nature’s: pollinators mason and leaf-cutter bees.
Amy says
Gardeners sure can be resourceful if they set their minds to it!
Ann Dudley says
Be sure to research the seed companies to find the best price. It was necessary for me to pay a little more to get a certain type of seed so I can try something new or the type of tomato I wanted. As in the article research is very helpful. Try your county extension office for info about these things.
Amy says
Great point 🙂
Karen says
Doing a garden little by little is such good advice. Not having resources of time and money is often a blessing. In fact, not having them can actually save you time and money! 🙂
Your photos are beautiful btw. Are they all from your garden?
Amy says
It is quite the puzzle to think that not having time and money can save you time and money?! Yet it is so true.
Thanks for the compliments on the photos. Yep, they are all from my garden except the one that links to Small Town Homestead. 🙂
Karina says
Can’t wait to get gardening this year! Thanks for the tips :).
Just recently discovered your blog and am really enjoying it! We’ve been wanting to homestead for years, but it hasn’t been possible with jobs and budgets…love the tips on how to make suburbia work for now…
Amy says
Yay! I’m so glad you’re finding some helpful information here. Please check back with your progress 🙂
Ron V says
Low or no cost alternatives to raised beds is a lasagna style bed (layers of material for plants to grow in). It can also be the start of a in ground garden (proper drainage and vermiculture). My main expense is the annual rent of a rototiller (heavy clay soil with 10 years of amendments are producing good results(tomatoes crushed their cages and green tomatoes were selectively ripened(harvested before hard frost) until New Years. Best expenditure is a good soil test,you have to know where you are starting from.
Amy says
A soil test is certainly an important piece of knowing the land you wish to garden. Thanks for the tip 🙂
Inge Leonora-den Ouden says
My tip: share the expensive garden tools with neighbours!
Shah says
Can’t wait to start little garden. doing research before start and your info was so good. I have small space behind house and want to make something good of it. thinking to have new hobby. after reads some info I decide to use pallet beds for gardening. its very low cost and suitable with the space. anyway thanks for your very useful tips.
from Malaysia. tropical rainforest climate.
dragon queen says
Last year I took a cheap hydroponic basil plant from a supermarket and snipped it up into 2-inch segments and grew whole plants out of it. If you are going to do this, make sure that you don’t wait too long to put them in the ground, and prune often for a bushy plant!
Andy says
Can you fill a raised bed with pure compost? If not, what mix do you recommend?
Amy says
There are many raised bed ‘gurus’ out there who have their favorite mix, but the truth is, what soil mix you grow successfully in will be dependent on many things, including your local climate, rainfall patterns, and soil type. Unfortunately there’s not ‘One Mix to Rule Them All’. The safest approach is to blend half topsoil with half compost. Whether you’re buying in bulk or in bags, look for superior, chemical-free quality. I’ve ruined many a garden by buying local compost that was made from anonymous fill. Full of toxins as well as weed seeds.
In my beds, what worked well for me was organic topsoil and compost, horse manure from a local farm, supplemented with organic matter from my own property such as homemade compost, shredded leaves, grass clippings, composted wood chips, etc. The more variety you add, the more well rounded the nutrient complex of your soil mix will be. Only limit yourself by insisting on chemical free organic matter. Straw and hay are typically laced with herbicides so find a local farmer who doesn’t spray.
In super wet climates, adding something like vermiculite will lighten the soil and help it dry out faster. Again, it all depends on the conditions of the site.
Marian says
Doing research would have saved me time and money for sure! The free zucchini plants I got on Craigslist cost me many hours and over $100 on soil, flowers, pots, and eventually hand pollinating, and yielded 1 zucchini! After months of research I make better, faster compost, and am slowly accumulating pollinator friendly plants. And in the meantime I’m growing Brussels sprouts, which don’t need pollinators. 🙂
Valentin says
Very easy and well explained. The start-up is always hard, you wait, time passes and nothing happened. I will surely start my own garden this year.
Genevieve Neff says
I’ve been gardening for 50+ years on the same property and am still learning. Had apple maggots in my Honey Crisp apple tree so put a new bed under the tree to combat the problem as I don’t use sprays or chemicals. Perimeter of the bed was 37′ . I filled it with good black dirt bordered with high edging and then rock. Planted onions around the edge, then calendulas, comfrey, anise hyssop, yarrow, and finally white clover in the inner circle. After harvesting the onions, planted daffodil bulbs in the outer perimeter. Anxious to see the return this spring. Hope this helps the soil and rids my problem of flies causing the maggot problem. Love your book and your approach to gardening and growing.
Amy says
This sounds fun, I look forward to hearing how it turned out for you!
Jessica says
Just wanted to share some tidbits on budget and gardening: Last year, I tracked how much we spent on produce for 6 months (for a family of 3) and exactly what yield we got from our vegetable garden. We spent $688 on produce (I only tracked produce that could be grown in our climate) in 6 months and harvested $652 worth of produce (nearly 200lbs) in the same 6 months. Our main vegetable garden is six 4×4 raised beds, with a few extra plants/pots scattered around the rest of our 1/4 acre yard. The yield was still less than we invested for the year because we built new raised beds last spring, but we can grow the same produce (or more) this year with only the cost of seeds, so our yield will far outpace our input. My goal for future years is to produce more and more of our groceries in our yard.
One thing I’m focusing on this year is seed swapping, sharing, and saving so that even seed costs will go down in future years. Reddit has a seedswap group that has already provided me with 6 new seed varieties for the cost of a couple stamps!
Martha Keller says
I scrounge from construction sites. Find large pieces of sheet goods, lumber, windows, etc. I’m retired on a limited income. With recycled glass windows—lots of them—I’ve built a greenhouse 12’ by 16’. We just renovated our barn roof and I used the old panels to make 3-32’ raised beds for stand up strawberries. Straw bales are great for filling the beds plus manure from coop and gathered manure in the horse pasture. Lots and lots of shredded leaves. A relative is going to dig a pond and I’ll scrounge all that lovely soil (even if it’s clay—East TN). If you live In Mecklenburg county NC or Lancaster county SC checkout the recycle/dump center. $10 for an oversized load of chips, $20 for compost. The yard scoops are massively generous!
Natalia says
Thank you so much for these tips! I can’t wait to get started with gardening this year (as in setting myself up beyond the few pots of herbs and spinach I do my best to keep alive) – but I only have a small space, and budget is definitely a restriction for me. And that’s on top of the general overwhelm of starting something new! These small actionable steps are so useful. I’ve never even heard of a community toolbank before – what a great concept. I’ll search my area and see what’s available.
Cheers for the reminder that starting small and slow is still starting somewhere – momentum always builds once we take that first step! Like you said, all you have to do is get started and you’ll quickly figure out what you really need. This is what I understand to be the nature of the permaculture journey anyway – to take things slowly, observe if and how it works, iterate on that and bit by bit, create a thriving system uniquely adapted to the climate and landscape around you.
Thomas Schwarz says
Great stuff, recycling raised bed materials! You’re brilliant!